You wont believe how easy and fun these crafts are!
advertisement
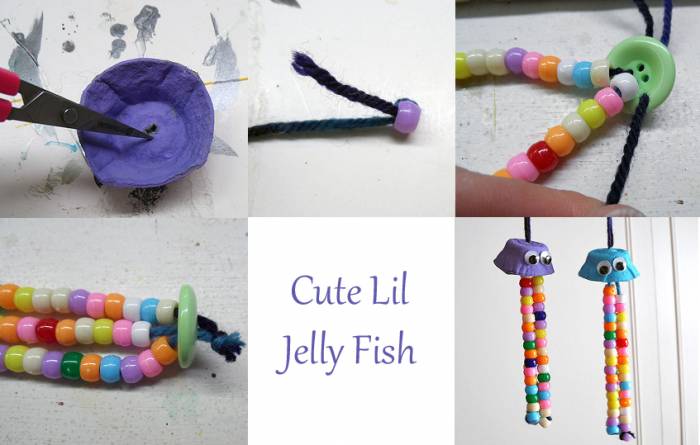
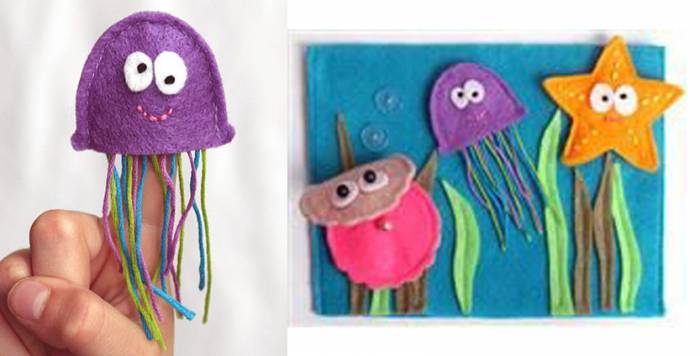
Cute lil Jelly fish
Easy to make but lots of fun things to do!
For this craft you will need
Materials:
2 cardboard egg cups
Paint: 2 different colors of your choice
Yarn - any color
Pony beads (15 - 17 per yarn string)
2 large 4-hole buttons
Toothpick
Hot glue gun
Googly eyes
White craft glue
Scissors
Paint brush
Instructions:
1. Paint the egg cups, paint each one a different color
2. While the egg cups are drying, create the beaded tentacles. Cut a piece of yarn 12-inches in length. Tie a pony bead to one end. Trim the excess from the knot and rotate the knot so that it lines up with the hole in the bead. Thread on 16 more beads. Do this for each tentacle. Each Jelly fish should have 3 tentacles.
3. Use a toothpick to push the top end of the yarn tentacle through one of the button holes. Repeat with the other two and a gather the three pieces of yarn together and tie into a knot. Trim the excess yarn. Do the same thing for the second Jelly Fish.
4. Poke a hole in the center of the egg cup. Take another piece of yarn, 5-inches in length. Loop it and put both lose ends through the hole in the egg cup then tie the ends together in a knot. The knot will stop at the hole, secure it with glue.
5 Hot glue the button up into the underside of the egg cup jellyfish head. The tentacles will be hanging down. Allow it to dry completely before trying to display as it will be a little heavy
6 Glue googly eyes to the front of the egg cup.
Shoe Box Fish Tank
The little older kids will enjoy this!
What you need
Materials:
Shoe Box or plastic storage container
Blue and Green Tissue Paper
Construction Paper
Pipe Cleaners
Tooth Picks
Mod Podge Glue
Shells
Crayons or Magic Markers
Small clothes pins
Scissors
While glue
Sponge paint brush
shells
Medium pom poms
Googly eyes
Instructions:
Cut the blue Tissue paper into different size pieces between 2 and 4 inches. Does not need to be even or even square - just random pieces.
Pick a section of the inside of the box and paint it with Mod Podge glue. Start gluing the blue pieces of tissue paper randomly on the mod podge. Then move to another section and do the same until the inside of the box is dry.
Cut the green tissue paper into sea-weed and long narrow leaves and place aside while the inside of the box is drying.
Cut fish shapes out of the construction paper and draw on the face - eyes - fins and gills...you could also decorate them with sequins or rhinestones if you choose. When those are done, glue a tooth pic to the back of each one. Towards the top if you want it to hang down and towards the bottom if you want it down towards the bottom.
Cut out sea shells and star fish out of construction paper if you want as well. These you will glue to the sides and bottom of your box.
To make the Crab use a Pom-pom pipe cleaners and clothes pins, glue the pipe cleaners to the pom pom for its legs and clip the clothes pins to the front of the crab for its claws
Once you have everything ready to go inside you can begin assembling your fish take how ever you like.
Be sure to glue the "sea-weed - and long thin plant leaves" made from tissue paper inside first before you decorate the rest of the box.
Enjoy, be creative and have fun!
Have mom or dad poke the holes for the toothpicks
advertisement
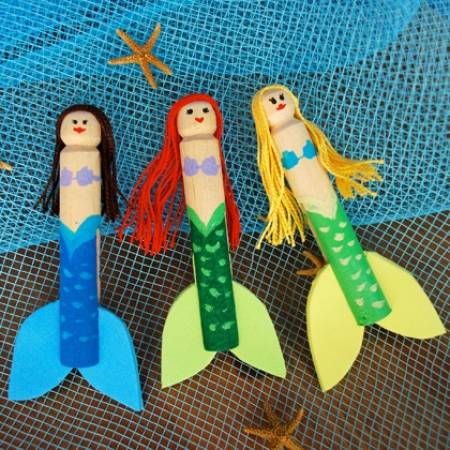
Cloths Pin Mermaids
These sweet little Mermaids are easy to make
What you need
Materials:
Rounded wooden clothes pins
Paint or Magic Markers
Yarn or needle point thread
Foam craft sheets
Glue
Scissors
Paint brush
Instructions:
Paint or color the Mermaid to your liking,
Cut several strands of yarn or needle point thread to the desired hair length. (If using yarn you can separate the strands that are twisted together) Place glue on top of the Mermaids head and glue on the strands.
Cut leaf shapes out of the craft foam sheets (two "leaves" for each Mermaid) or one tulip shape for each Mermaid. Put glue on the foam cut out and slide into the clothes pin. Ta Da! You're done!
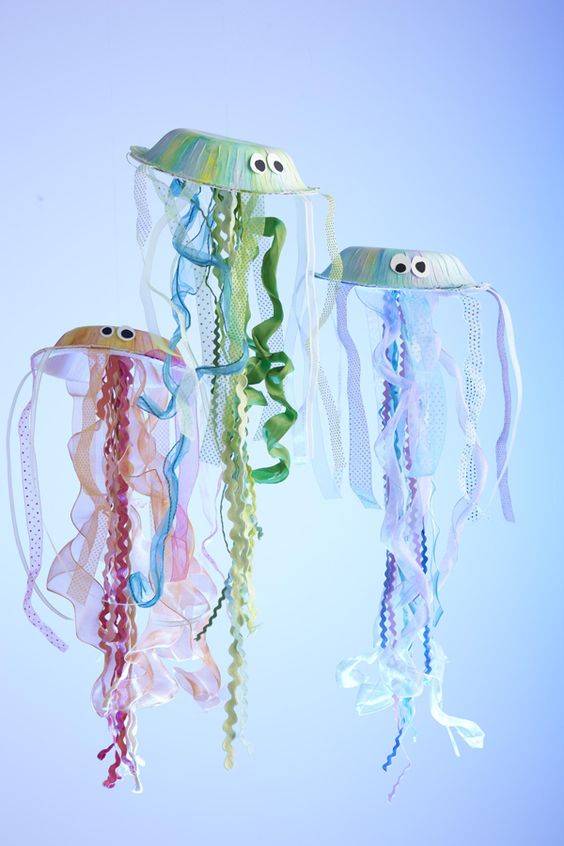
These are really cute!
For these paper plate and ribbon Jelly Fish
you will need
Materials:
Paper bowls (plastic would work) 2 per Jelly Fish
Different strands of ribbon or trim ribbon
Scissors
Glue
Googly eyes
Paint brush
Paint
Instructions:
Paint or color the bowls any way you like.
Next, once dry if painted, take one of the bowls and poke little holes randomly in the bottom of the bowl.
Cut random lengths of ribbon. Thread a piece of ribbon through each hold and glue to the underside of the bowl. (the side that would sit on the table if you were to use it).
With the bowl still upside down, glue a couple of pieces of ribbon randomly on that side of the bowl so that they hang over the sides. (no need to put these through holes)
When that is done, take the other bowl (the one with out holes) and place over the first bowl, covering the glued pieces of ribbon that is sticking through the holes. Add Googly eyes.
If you wan to hang it you could poke a small hole through the middle of the top bowl and before you glue it to the first bowl cut a piece of yarn to the desired length and fold it in half, stick both loose ends through the hole and tie in a knot securing it with a little glue. Then place it over the first bowl.
advertisement
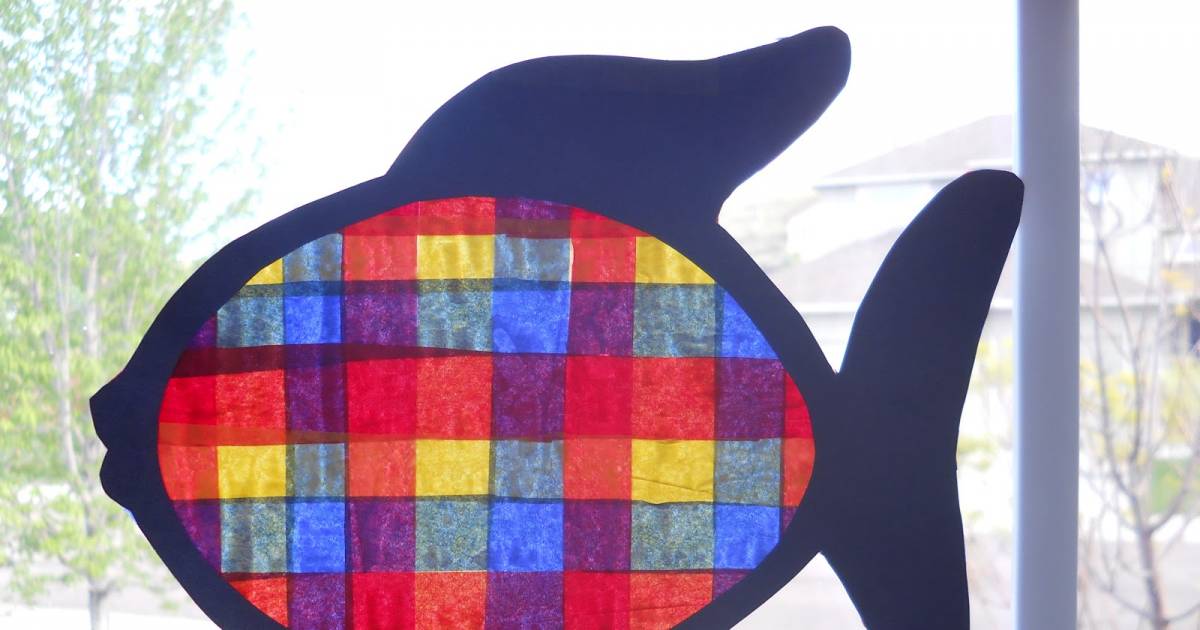
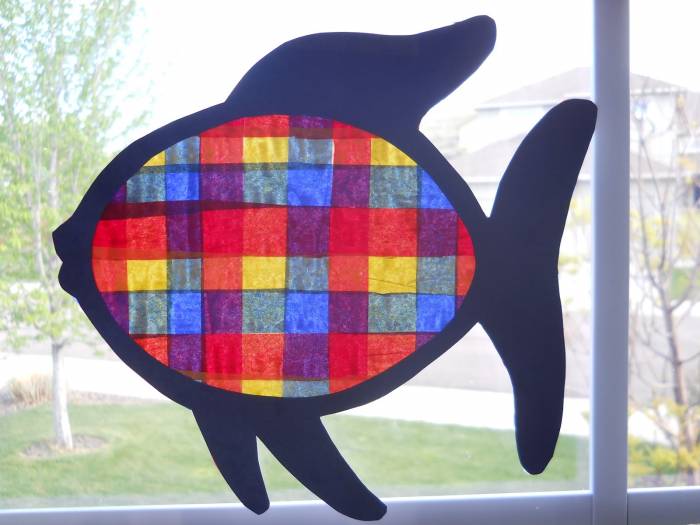
Stained Glass window hangers
This one is one of my favorites.
What you will need
Materials:
Tissue paper - at least 4 different colors
Mod Podge glue
Scissors
Construction Paper or foam craft sheets (Non adhesive)
Paint brush
Instructions:
Cut 3/4 inch wide strips of each color tissue paper. Horizontally lay each strip on flat surface alternating colors. Next weave Vertically alternating colored strips through the horizontal ones.
Cut out a fish "frame" from the construction paper or craft foam sheet. Put glue around the edges and place on to the woven strips. when dry cut off the excess tissue paper. You can also glue a second frame to the other side to cover the edges. Poke a hole if you like in the top fin and hang in a window! Beautiful!
Another way is to randomly cut several pieces of tissue paper and glue each piece to the frame working from the outside in.
advertisement
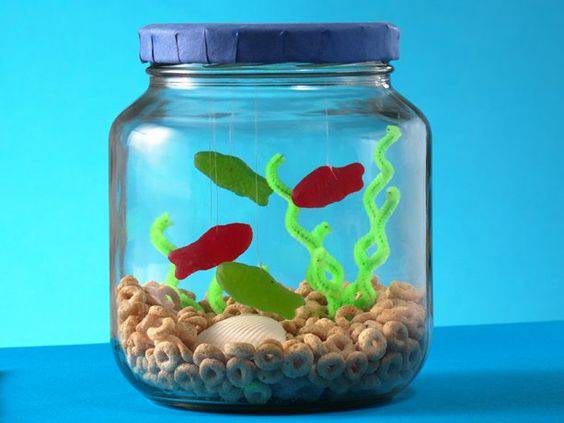
Gummy Fish Jar
And you don't have to feed them!
For this project you will need
Materials:
Glue or tape
Construction paper (any color), if desired or you could just paint the lid
Large empty jar (such as a Olive or pickle or maraschino cherry jar)
Green pipe cleaners (chenille stems)
Pencil
Scissors
"O" cereal
Shells and/or rocks
Nylon fishing line
Darning needle
Gummy candy fish
Instructions:
Glue construction paper to the jar lid to cover, (or paint)
Wrap 1 pipe cleaner around the pencil to give it that squiggly look. Stretch out the coils to make wavy seaweed.
Cut the coiled pipe cleaner into several pieces. Bend 1/2-inch foot onto each piece of seaweed. Cluster several weeds together at the foot and secure to the inside bottom of the jar with glue or tape.
Pour the cereal into the jar to a depth of about 1 inch. Arrange shells and/or rocks in the cereal.
Using the fishing line and a darning needle, thread a piece through each gummy bear at desired lengths. Tape each piece of line to the inside of the jar lid.
Lower the fish into the jar and screw on the lid.
You could also glue the lid shut to keep everything safe inside.
advertisement
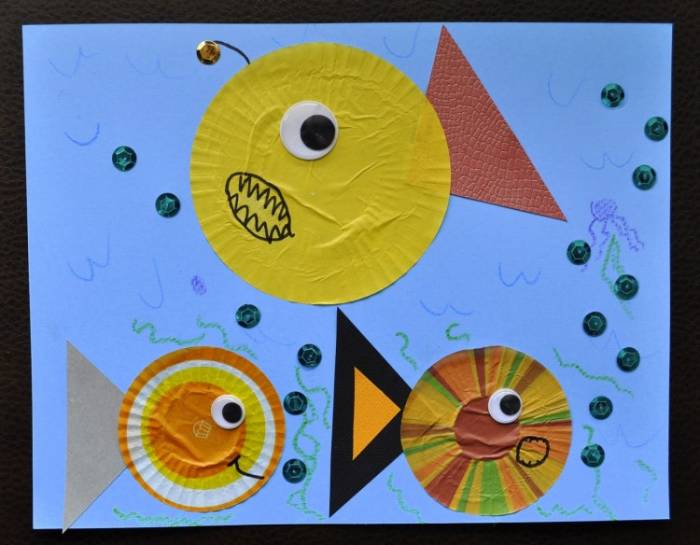
These are the easiest ever!
These wont take very long to do but are they ever cute! Would make a nice card too!
What you will need
Materials:
Construction paper
Patterned card stock
Glue
Scissors
Ribbon
Googly eyes
Instructions:
From the card stock cut out the Jelly Fish's head.
Cut several pieces of flat ribbon and curl them with the scissors.
Glue each piece of ribbon to the back side of the Jelly Fish's head.
Place some glue on each Jelly Fish then place on to a piece of card stock or construction paper.
Glue on Googly eyes.
You can get creative and glue some seashells on to the background and some sequins for bubbles as well!

advertisement
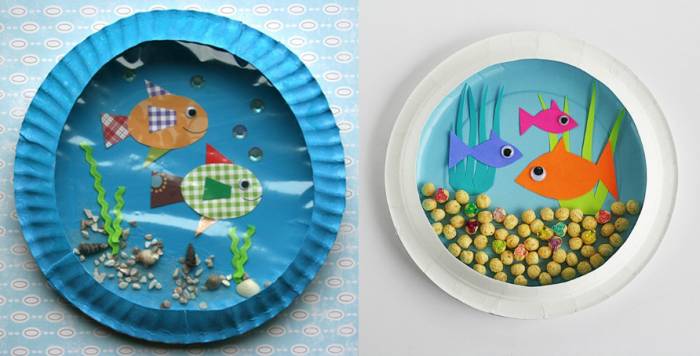
Port Hole Window
This is just too cute! You can be fancy or keep it simple!
What you will need for one or both of them are
Materials:
Paper Plates (colored or paint them yourself)2 per window
Blue Paint (if you choose to pain them)
Construction Paper
Scrap material
Trim Ribbon
Rhinestones
Glue
Googly eyes
Scissors
Rice and or small pebbles
Seashells
Paint brush
Marker to draw the mouth
Instructions:
Take one paper plate and cut the middle out of it. Paint it if you want and set it aside.
Take the other paper plate and paint it if you choose. Set it aside to dry.
cut fish bodies and fins and background plants out of the construction paper or material.
Cut a few pieces of trim ribbon random sizes.
When plates are dry you can begin to assemble your window, gluing each piece on to the plate.
When done gluing all your pieces onto the plate, take the other plate (the one that you cut out) and turn it upside down and glue it to the other plate.
advertisement
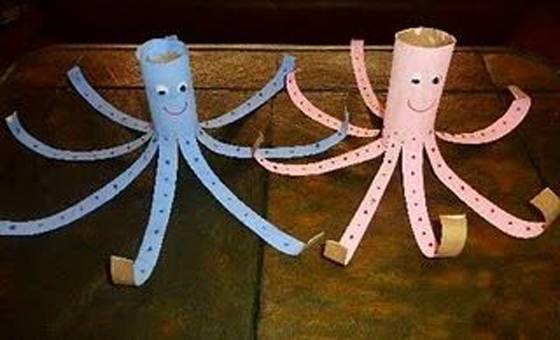
Octopus!
Another easy one!
For this you will need
Materials:
Empty Paper Towel or Toilet Paper rolls
Googly eyes
Paint
Magic Markers or Crayons
Sequins or Rhinestones
Glue
Paint brush (the sponge ones work best)
Scissors
Trim Ribbon (optional)
Instructions:
Paint each tube and let dry for at least 3 hours. (Maybe paint before lunch and nap time then continue when nap time is over?)
Glue on Googly eyes and either draw on mouth or you could use trim ribbon if you like.
Cut 8 tentacles into the tube. going about 2/3 the way up.
Decorate each tentacles with markers or crayons or rhinestones or sequins.
Roll the end tips of each tentacles about 2 inches up and unroll
advertisement
3D Felt Fishes!
The older kids could certainly help the younger ones with this.
What you will need
Materials:
Several Pieces of Felt - different colors
Yarn - different colors
Cross stitch needle (or one with a slightly larger hole)
Glue
Small pom poms or Googly eyes
Scissors
Instructions:
Cut desired shapes out of felt and decorate them as you choose. You can glue on eyes or sew desired designs on to them. You could also sew around the edges to give them a 3 dimensional look to them before you glue them down.
These would look nice hung on a wall - framed or as is!
For the puppet just cut double of each shape and sew or glue the edges together leaving the bottom edge open.
advertisement
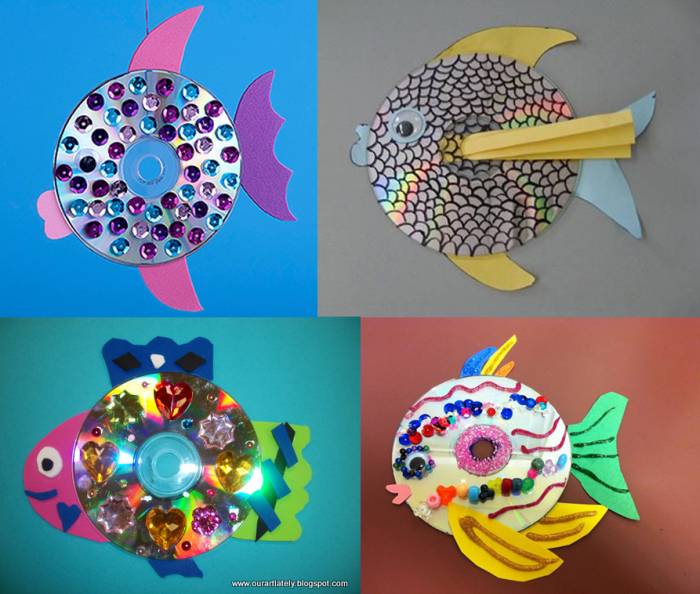
CD Hanging Fish
Old CD's are good for all sorts of craft projects. Here is one kids could make!
What you will need
Materials:
2 Old CD per fish
Glue
Construction paper, or felt, or card stock or flat foam sheets (not the adhesive ones) any of these would work.
Sequins or rhinestones or small pom poms (pretty much anything you can glue to the CD.
Magic Marker
Yarn or twine
Googly Eyes
Scissors
Instructions:
Glue a Googly eye to each CD on the iridescent side (with no writing) Be sure to align each eye with the other CD.
Cut out the fins and glue them to the opposite side of the CD. The noniridescent (the side with the writing.)
Next glue Sequins or rhinestones or small pom poms to the (googly eye side) CD. Do this for the second CD too.
Take a piece of yard or twine how ever long you want. Fold it in half and tie the loose ends together then glue it to the un-decorated side of one of the CD. about a half inch from the edge.
When both CD's are dry, Glue both non decorated sides together.
If you didn't cut out a mouth for the fish you can draw it on with the marker.
Be creative and have fun! Make several and make a mobile!
advertisement
Cupcake Fish
The little ones will have fun with this one!
What you will need
Materials:
Cupcake or mini cupcake tin liners
Construction paper
Crayons
Sequins
Glue
Magic Markers
Scissors
Instructions:
Flatten out the about 3 cupcake liners
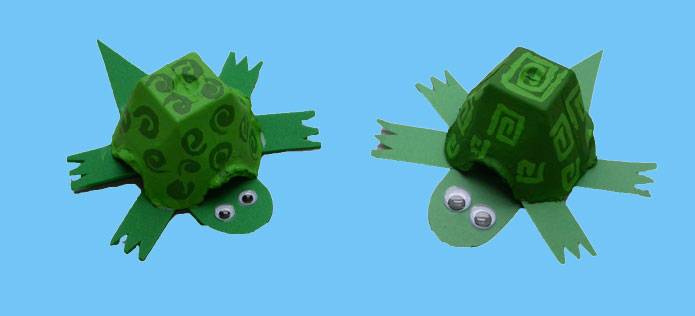
Turtle friend!
Sweet little turtles!
What you will need
Material:
Green construction paper or craft foam
Cardboard egg carton
White craft glue
Googly eyes (optional)
Green paint (2 different shades)
Scissors
Paint Brush
Cut out a single turtle shell from the egg carton. Choose one shade of green and paint the outside of the shell.
While the shell is drying, cut two rectangles (1/2" x 3 1/2") out of construction paper or craft foam to make legs. Cut two little triangles into both ends of each rectangle to add feet to the legs.
Cut one rectangle (1" x 4") out of construction paper or craft foam. Trim one end to make a pointy tail. Round off the other end to make a head. Draw eyes on the turtle's head or add google eyes.
When the shell is dry, use the other shade of green paint to make designs on your turtle's shell. Be creative!
When the shell is completely dry, glue the legs, tail, and head to the bottom rim of the egg carton shell. The body parts should poke out from under the egg carton like a turtle would from under its shell.
advertisement
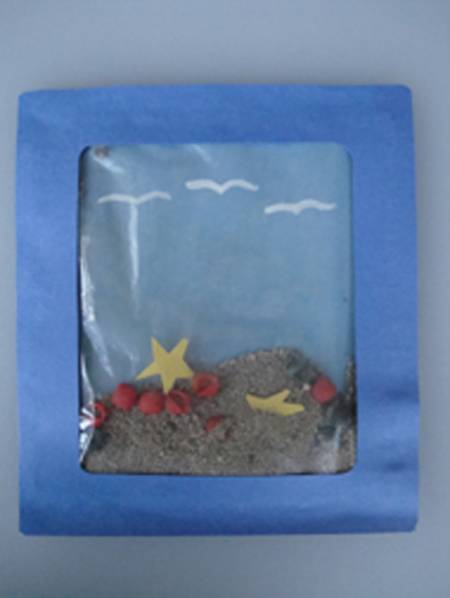
Beachscape
This one is a fun one to do while on a vacation at the beach, unless of course you already live on the beach!
What you will need
Materials:
Construction paper - blue and light blue
Sandwich-size zip-lock baggie
Glue
Sand
Measuring spoons
Small macaroni shells
White paint and brush
Food coloring
Scissors
Cut off the part of the baggie that is above the zipper, but don't cut off the zipper! Doing this will make it easier to glue the fame around the bag,
With the longest side of the rectangle running vertically, paint on some white seagulls onto your blue background paper, both on the top and the bottom (that way it will look the same no matter which way you turn it) You'll want to paint your seagulls between 1½" - 2" from the top so that the top boarder doesn't cover them up!
Cut out star fish from yellow construction paper. Color your macaroni by placing a few into a baggie and adding 2 drops of food coloring. Seal the bag and squish it around until the macaroni is covered. It will only take 1-2 minutes for it to be dry and ready to use.
Add 2 - 3 tablespoons of sand into the baggie and add your shells and starfish. Seal the bag.
Get all the sand into the center of the bag. Sandwich the baggie between the two papers by spreading glue along the edges of the baggie, front and back. Also spread glue on the outer edges of the paper boarder. In other words - The Sky rectangle with the painted seagulls is glued behind the baggie, and the boarder is glued on top
Turn your seascape upside down and right-side up and it will look the same!
*An easier way to do this I think is to glue the 3 outside edges to the center of the light blue paper *once the seagulls have been painted on* leaving the zipper side unglued.
Then fill your bag with the sand and shells and cut outs.
Seal the bag and glue the final edges.